In this blog post I’m going to share a few tips and tricks on how to streamline your Terraform tasks in Azure DevOps release pipelines. I use Azure DevOps release pipelines and Azure backend resources as examples but many of the tips apply to other release management tools and cloud providers.
1. Update your .gitignore
Add the following entries to your .gitignore to avoid accidentally committing these Terraform files to your Git repo.
#  Local .terraform directories
**/.terraform/*

# .tfstate files
*.tfstate
*.tfstate.*

# .tfvars files
*.tfvars
2. Use a non-local Terraform backend
Create a non-local backend for your Terraform state storage. For example, in case of an azurerm backend:
2.1. Create backend storage
az group create -g rg-hello-azure-tf -l northcentralus

az storage account create -n sahelloazuretf -g rg-hello-azure-tf -l northcentralus --sku Standard_LRS

az storage container create -n terraform-state --account-name sahelloazuretf
2.2. Configure the azurerm backend in Terraform
provider "azurerm" {
  version = "=2.0.0"
  features {}
}

terraform {
  backend "azurerm" {
    resource_group_name  = "rg-hello-azure-tf"
    storage_account_name = "sahelloazuretf"
    container_name       = "terraform-state"
    key                  = "terraform.tfstate"
  }
}
3. Use Terraform workspaces
Create a Terraform workspace for each target environment, i.e. Dev and Test. Then simply switch between the workspaces using the same shared backend configuration.
I intentionally capitalized the workspace names to show how to apply uniform capitalization, if needed, later in Terraform resource names.
terraform init

terraform workspace new Dev
terraform workspace new Test

terraform workspace select Dev
4. Use ${terraform.workspace}
Use ${terraform.workspace} in your .tf files to get the current workspace name and avoid an extra input variable. For example, append the current workspace / environment name to an Azure resource group name.
Please note how easy it is to lowercase (or uppercase) the workspace name to the desired case.
resource "azurerm_resource_group" "rg-hello-azure" {
  name     = "rg-hello-azure-${lower(terraform.workspace)}"
  location = "northcentralus"
}
5. Validate and check the execution plan locally
Run the terrraform plan command to validate the configuration and check the execution plan.
terraform plan
6. Don’t apply changes locally
Once you’ve validated the changes, commit them to a Git repository and let the Azure DevOps pipeline do the rest (covered later in the article). Don’t run terraform apply locally to avoid multiple people independently making changes to the same environment.
7. Create a release pipeline
7.1. Create a new empty release pipeline in Azure DevOps.
- Create a new stage for your integration environment, i.e.
Dev Plan. - Add an Azure Repository artifact selecting the Git repository that contains your Terraform files.
- Enable continuous deployment trigger, if desired.
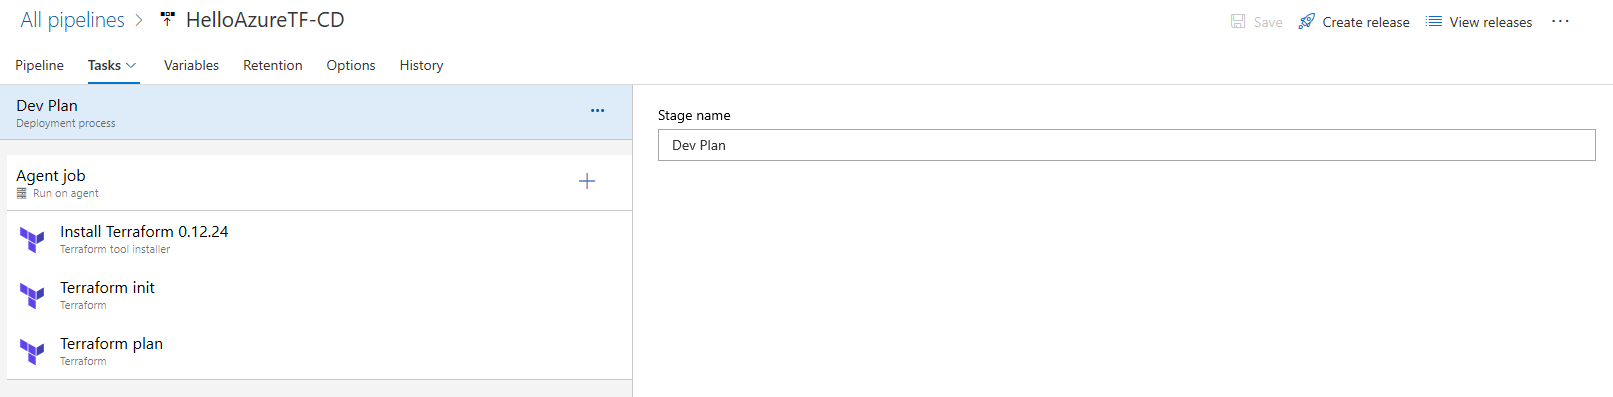
7.2. Add a Terraform tool installer task to the Dev Plan stage.
- If necessary, install the Terraform extension by Microsoft DevLabs from the Azure DevOps Marketplace.
- Configure the task to install the desired Terraform version (run
terraform --versionto confirm the version used locally).
7.3. Add a Terraform init task.
- Add a
Terraformtask. - Select the
azurermprovider. - Select the
initcommand. - Select the configuration directory by browsing to the folder that contains your
.tffiles. - Complete the
Azure RM backend configurationsection by using the same backend configuration settings you used locally earlier.
7.4. Add a Terraform plan task.
- Add a
Terraformtask. - Select the
azurermprovider. - Select the
plancommand. - Select the same directory as in the task above.
- Select the target Azure subscription for this environment.
7.5. Set the following pipeline variables.
| Name | Value | Scope |
|---|---|---|
| TF_CLI_ARGS | -no-color | Release |
| TF_IN_AUTOMATION | true | Release |
| TF_INPUT | false | Release |
| TF_WORKSPACE | Dev | Dev Plan |
7.6. Save the pipeline.
7.7. Create a new release and check the execution plan.
7.8. Create a Dev Apply stage.
- Clone the
Dev Planstage. - Rename the new stage to
Dev Apply. - Rename the
Terraform plantask toTerraform apply. - Change the command from
plantovalidate and apply. - Enable a pre-deployment approval for the stage.
7.9. Save and rerun the pipeline.
- Once the
Dev Planstage completes, you’ll get an approval request notification for theDev Applystage. - Review the execution plan and approve the release.
- Verify the Azure resources created according to the plan.
7.10. Add stages for other environments.
- Clone the
Dev PlanandDev Applystages. - Remember to change the
TF_WORKSPACEpipeline variable values to match the workspace / environment names of the new stages.
The final pipeline configuration should look similar to this:
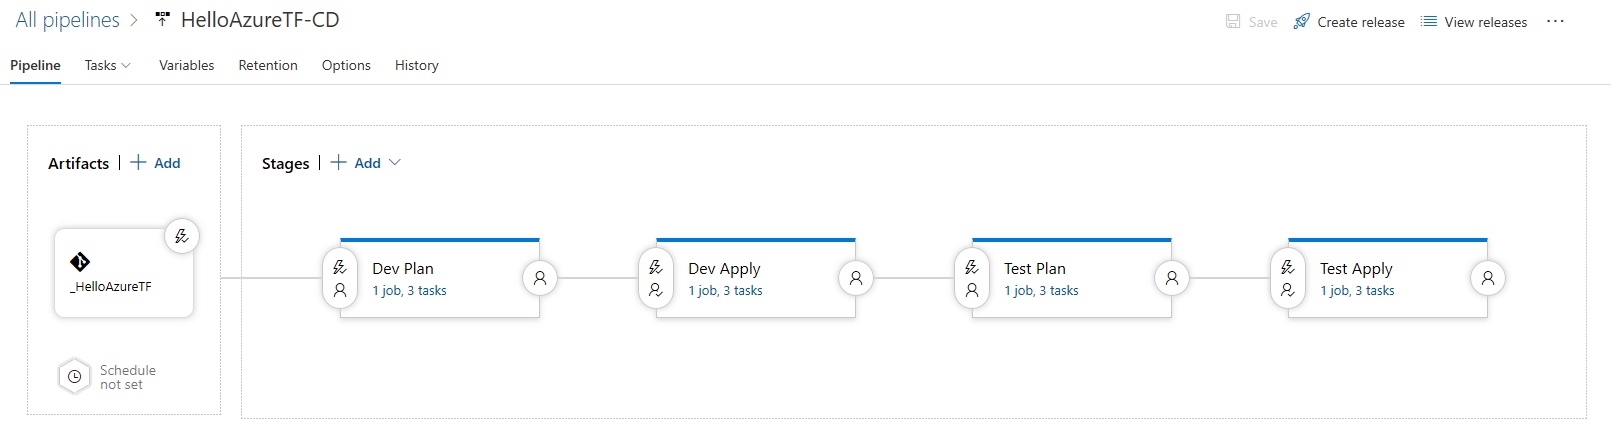


It’s not perfect since we aren’t using the exact output of the terraform plan command as an input to terraform apply but it’s close enough!
Feel free to share your suggestions in the comments section below. I’d like to hear your thoughts!
